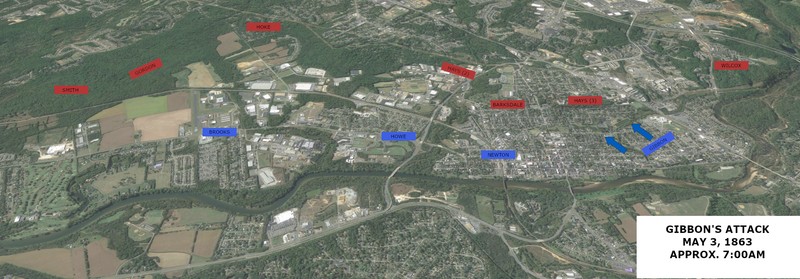
Gibbon's Attack, May 3, 7:00am
Introduction
Text-to-speech Audio
Second Fredericksburg, Part VI: Sedgwick wanted to avoid a direct assault on Marye’s Heights and did not have complete information about the Confederate line. He ordered Gibbon’s Division to a position north of Fredericksburg to attempt to flank the Confederate defenses on Marye’s Heights. Unfortunately for the Union, the reinforcements of Hays and Wilcox had just taken their positions and artillery fire from the heights, as well as the inability to cross the canal, stopped Gibbon’s attack.
Images
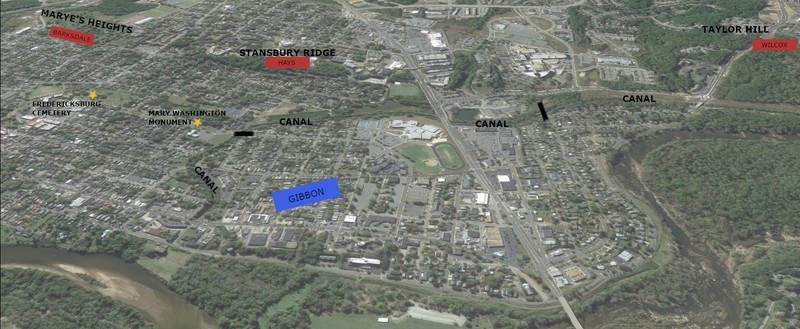
Gibbon's division attempts to attack the Confederate flank (map by Kathleen Thompson)
The first Union attempt at Marye's Heights, May 3 (map by Kathleen Thompson)
1850s map of the canals, dam, and mill sites in the City of Fredericksburg. This maps shows the location of the Mary Washington monument with the canal bridge nearby, as well as a second canal bridge further northwest.

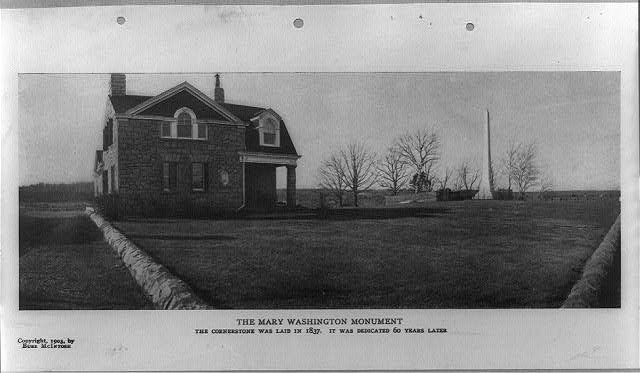
1903 images of the Mary Washington Monument. During the Civil War the monument was only partially complete (the cornerstone was laid in 1837 but it took decades to finish). The heights are visible in the background. Note the wide open landscape compared to the same location today.
Report of Brig. Gen. Gouverneur K. Warren for the Chancellorsville Campaign, page 1
Report of Brig. Gen. Gouverneur K. Warren for the Chancellorsville Campaign, page 2
Report of Brig. Gen. Gouverneur K. Warren for the Chancellorsville Campaign, page 3
Report of Brig. Gen. Gouverneur K. Warren for the Chancellorsville Campaign, page 4
Report of Brig. Gen. Gouverneur K. Warren for the Chancellorsville Campaign, page 5
Report of Brig. Gen. Gouverneur K. Warren for the Chancellorsville Campaign, page 6

Report of Brig. Gen. Gouverneur K. Warren for the Chancellorsville Campaign, page 7
Report of Brig. Gen. Gouverneur K. Warren for the Chancellorsville Campaign, page 8
Report of Brig. Gen. Gouverneur K. Warren for the Chancellorsville Campaign, page 9
Report of Brig. Gen. Gouverneur K. Warren for the Chancellorsville Campaign, page 10
Report of Brig. Gen. Gouverneur K. Warren for the Chancellorsville Campaign, page 11
Report of Brig. Gen. Gouverneur K. Warren for the Chancellorsville Campaign, page 12
Backstory and Context
Text-to-speech Audio
Gibbon’s force of 3,400 men moved north of Fredericksburg starting around 7:00am. Maj. Gen. Gouverneur K. Warren, sent from Chancellorsville early in the morning to assist in Sedgwick’s advance, rode ahead of Gibbon’s men to view the landscape. Crossing over a mill race and advancing to the point of the Mary Washington monument, Warren saw that the bridge over the Fredericksburg canal had been dismantled. As Gibbon’s men moved into position, Warren ordered planking brought forward to repair the bridge.
Unfortunately for Gibbon and Sedgwick, the Confederate reinforcements of Hays and Wilcox took up their positions on Taylor Hill and Stanbury Heights in time to open artillery fire on Gibbon’s troops. Once the Confederate guns from Taylor Hill, Stansbury Ridge, and Marye’s Heights trained on the II Corps men, attempts to rebuild the bridge over the canal were impossible. The Federal troops were forced to take cover. Gibbon sent troops to the right to investigate if any advance could be made on a second bridge over the canal or up River Road, but both paths were either blocked or covered by the Confederate artillery.
To try to neutralize the Confederate artillery, Gibbon pushed two batteries of artillery from the 1st Rhode Island forward to positions near the Mary Washington monument. Sedgwick also sent infantry support from the 10th and 37th Massachusetts and 2nd Rhode Island. These troops took a position near the Fredericksburg City Cemetery, just behind the Rhode Island gunners. These efforts were futile however. The inability to cross the Fredericksburg canal had stopped Gibbon’s attempt to flank Marye’s Heights and delayed Sedgwick’s attempts to move west towards Chancellorsville.
Sources
Furgurson, Ernest B. Chancellorsville, 1863: The Souls of the Brave. New York: Vintage Books, 1992.
Gallagher, Gary W. The Battle of Chancellorsville. National Park Civil War Series. Eastern National, 2007.
Parsons, Philip W. The Union Sixth Army Corps in the Chancellorsville Campaign: A Study of the Engagements of Second Fredericksburg, Salem Church and Banks’s Ford, May 3-4, 1863. Jefferson, NC: McFarland & Company, Inc., 2006.
Sutherland, Daniel E. Fredericksburg and Chancellorsville: The Dare Mark Campaign. Lincoln: University of Nebraska Press, 1998.
Map by Kathleen Thompson
Map by Kathleen Thompson
"Map of the City of Fredericksburg with the Location of the Fred's'b'g Water Power Co's Dame, Canals, and Mill Sites." Maps. Fredericksburg, VA. Accessed May 5, 2021. https://www.fredericksburgva.gov/DocumentCenter/View/150/1850s-Fredericksburg-Water-Power-Company-Dam-Plan?bidId=
"The Mary Washington Monument, the cornerstone was laid in 1837. It was dedicated 60 years later." The Mary Washington Monument, the cornerstone was laid in . It was dedicated 60 years later. Fredericksburg Virginia, ca. 1903. Photograph. https://www.loc.gov/item/92508400/. Accessed May 11, 2021.
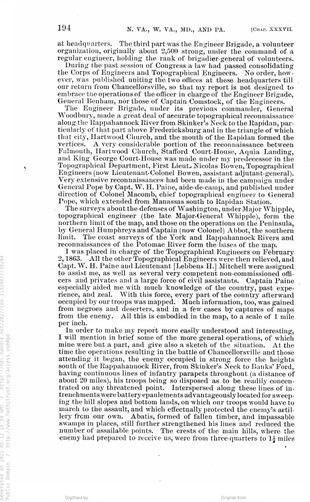
The War of the Rebellion: A Compilation of the Official Records of the Union and Confederate Armies. Series I-Volume XXV-Part I-Reports, page 193. Accessed May 12, 2021. https://babel.hathitrust.org/cgi/pt?id=coo.31924077730244&view=1up&seq=3.
The War of the Rebellion: A Compilation of the Official Records of the Union and Confederate Armies. Series I-Volume XXV-Part I-Reports, page 194. Accessed May 12, 2021. https://babel.hathitrust.org/cgi/pt?id=coo.31924077730244&view=1up&seq=3.
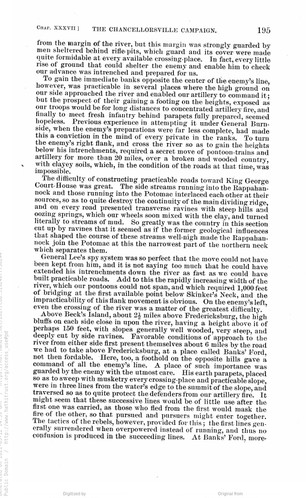
The War of the Rebellion: A Compilation of the Official Records of the Union and Confederate Armies. Series I-Volume XXV-Part I-Reports, page 195. Accessed May 12, 2021. https://babel.hathitrust.org/cgi/pt?id=coo.31924077730244&view=1up&seq=3.
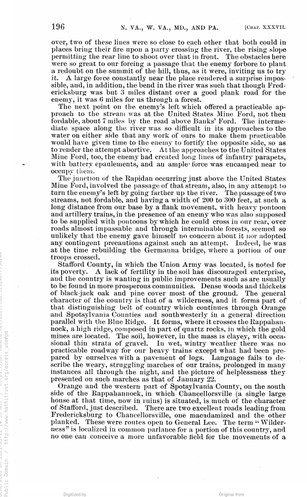
The War of the Rebellion: A Compilation of the Official Records of the Union and Confederate Armies. Series I-Volume XXV-Part I-Reports, page 196. Accessed May 12, 2021. https://babel.hathitrust.org/cgi/pt?id=coo.31924077730244&view=1up&seq=3.
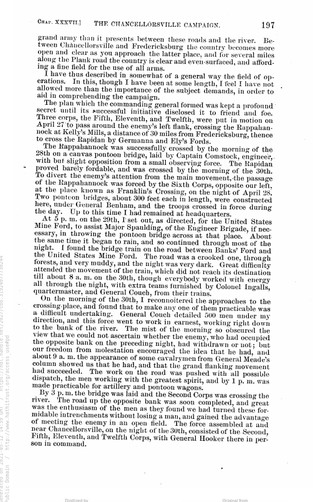
The War of the Rebellion: A Compilation of the Official Records of the Union and Confederate Armies. Series I-Volume XXV-Part I-Reports, page 197. Accessed May 12, 2021. https://babel.hathitrust.org/cgi/pt?id=coo.31924077730244&view=1up&seq=3.
The War of the Rebellion: A Compilation of the Official Records of the Union and Confederate Armies. Series I-Volume XXV-Part I-Reports, page 198. Accessed May 12, 2021. https://babel.hathitrust.org/cgi/pt?id=coo.31924077730244&view=1up&seq=3.
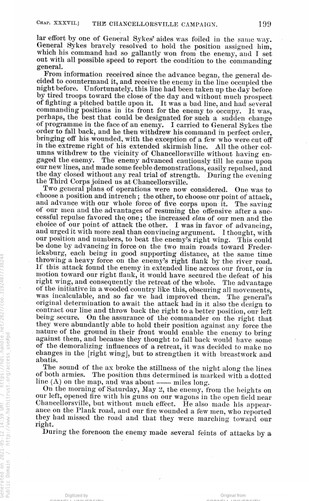
The War of the Rebellion: A Compilation of the Official Records of the Union and Confederate Armies. Series I-Volume XXV-Part I-Reports, page 199. Accessed May 12, 2021. https://babel.hathitrust.org/cgi/pt?id=coo.31924077730244&view=1up&seq=3.
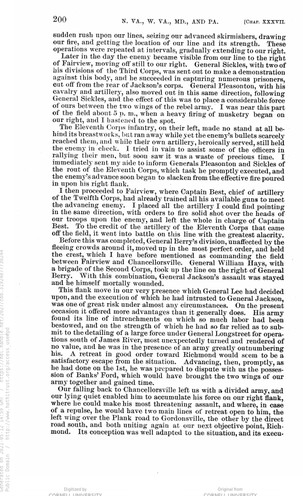
The War of the Rebellion: A Compilation of the Official Records of the Union and Confederate Armies. Series I-Volume XXV-Part I-Reports, page 200. Accessed May 12, 2021. https://babel.hathitrust.org/cgi/pt?id=coo.31924077730244&view=1up&seq=3.
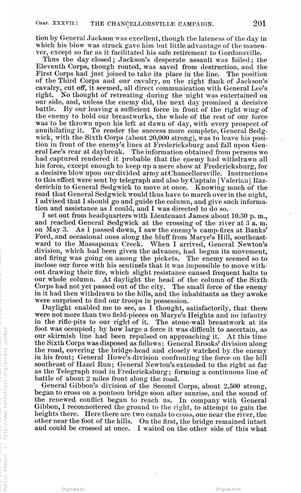
The War of the Rebellion: A Compilation of the Official Records of the Union and Confederate Armies. Series I-Volume XXV-Part I-Reports, page 201. Accessed May 12, 2021. https://babel.hathitrust.org/cgi/pt?id=coo.31924077730244&view=1up&seq=3.
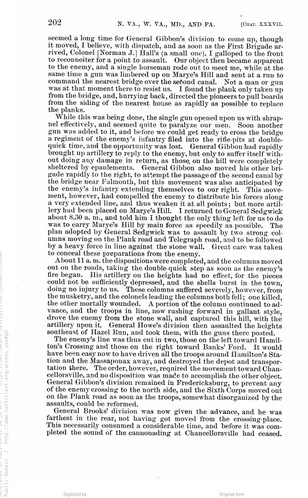
The War of the Rebellion: A Compilation of the Official Records of the Union and Confederate Armies. Series I-Volume XXV-Part I-Reports, page 202. Accessed May 12, 2021. https://babel.hathitrust.org/cgi/pt?id=coo.31924077730244&view=1up&seq=3.
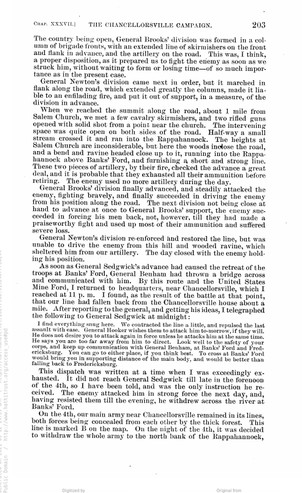
The War of the Rebellion: A Compilation of the Official Records of the Union and Confederate Armies. Series I-Volume XXV-Part I-Reports, page 203. Accessed May 12, 2021. https://babel.hathitrust.org/cgi/pt?id=coo.31924077730244&view=1up&seq=3.
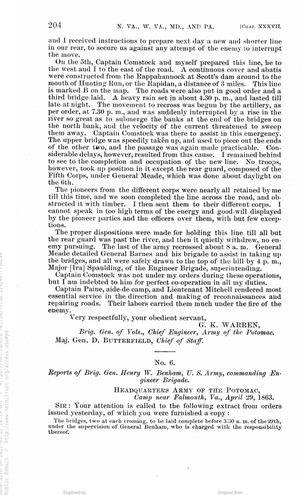
The War of the Rebellion: A Compilation of the Official Records of the Union and Confederate Armies. Series I-Volume XXV-Part I-Reports, page 204. Accessed May 12, 2021. https://babel.hathitrust.org/cgi/pt?id=coo.31924077730244&view=1up&seq=3.